Labels

Showing posts with label Pathway Stage. Show all posts

Friday, 27 March 2015

The swinging 60's, pop art and Ray Harryhausen. .

Saying I've done in depth research about this subject area at this moment in time would be a lie. I have however done a small amount of research on a wide range of different artists, skimming the surface of the sixties if you will.

Obviously the person who I found most interesting was Ray Harryhausen, the king of stop animation during that time. He worked on things such as clash of the titans, and mighty Joe young. He worked closely with producers such as Warner Bros. and therefore became a well recognised artist pretty quickly. His first film was created in 1953.
Richard Hamilton

Friday, 20 March 2015

Looking back IS looking forward.

Looking into the history of art allows you to see how art in the present, may develop in the future. Only by knowing the past can we anticipate the future. Modern expressionism has never been the kind of work that  I have been interested in, or even understand. But after doing some research into the artists, I've began to see that their work really does what it says on the tin. they are expressing how they feel through the only way they know best, painting.
 
So what have I learnt from all this.
  1. That artist movements are entirely the product of the environment surrounding influential artists.
  2. Work can be full of life without being full of colour.
  3. Artists react to the world around them, and often fight against the norm. Not to cause friction but to chase change.
  4. I HATE any work produced by mark Rothko and no amount of conversation about his work will change that.
  5.  

Friday, 13 March 2015

Max humphries, and simple mechanisms.

Max Humphries is an amazing puppeteer, who builds full costumes on  the basis of simple mechanisms. He has worked on pieces for stage productions such as The lion the witch and the wardrobe, Romeo and Juliet and Raven Girl.


Carving  from florists oasis is something I have seen recurring in different puppet making techniques. Its incredibly light and easy to carve from using simple tools such as a stanley knife or even just a pencil. Not only this but wire easily held inside it easily. it is also relatively cheap and therefore large pieces of work can be done without spending too much money. 

This mechanism was on Max Humphries website and shows how simple some mechanisms can be. i am going to attempt doing this using a clothes peg from home.

Wednesday, 11 March 2015

Making designs a reality


I decided to make my automatic drawings a reality by inflating bin bags on different sections of my body in order to alter the shape of the body.  I did this by securing the bags around my legs and arms tightly and inflating them using a foot pump.


This altered my appearance in the way I had intended and with some fine tweaking could create a cool piece of costume. If not the most practical.


I then began doing multiple bags on different limbs at the same time to see how much that changed the appearance of the costume.
 
 THIS WAS NOT COMFORTABLE! JUST SO YOU KNOW THAT!!!
I did like how it worked, it really made my appearance change and threw out the natural body shape you are used to seeing.  I then realised that the red elastic I had used to keep the bag on my head looked like a bow tie, and decided to turn the whole of the bag into the face of the character. This is not meant to be racist, I only had black bin liners.


I then covered myself into a black sheet to disguise the body and face so you cant tell that the head of the character is actually just air and not a person at all. I think this is an interesting idea and I might try develop it further by combining my earlier automatic designs with this practical technique to create a costume inflated by air.

Tuesday, 10 March 2015

Horse mechanics


After watching an actual video of a horse running in slow motion I then decided to try and create a small model of a horse that mimics the movement. This however is easier said than done.


I think I got the shape and proportions of the horse right, however an issue I did face was getting the movement right. One reason I couldn't correctly represent the movement was because horses legs move from the top of the hip joint, however I had placed the pivot point too low down. There for the movement was not as realistic as I had intended. I realised this mistake after watching the video of the running horse a few more times after creating this puppet.


However I did learn something from this section of my project which is that there are many simple ways of creating pivot points for joints when making a puppet. This was the first time I had attempted making a puppet of this kind and therefore I have a lot more research into the area of puppetry to be done.

This has proven to me once again that research is one of the most important elements of creating work of this kind and therefore will be more in depth with my research at the next opportunity.


Creating the parade horse.


Using florist's oasis I carved a stylised horse's
face. This created a base for me use to make a clay piece of work. My intention was to then work on top of the clay using latex to create a fully functional latex mask of a horse similar to that in parade.


 Working on top of the oasis was a challenge as the fibres of the oasis stuck to the clay and dried it out quickly, so working fast was incredibly important in order to avoid any cracking of the mask. It gave me opportunity to create more distinguished features on the horse. These features were over exaggerated and not realistic looking as this work was intended for the stage where things must be over the top so the entire audience can see the details of the work. I liked how it looked however it was a tough process that took up a large amount of my time.


This work was incredibly fragile which wasn't good as theatre work need to be as durable as possible this was therefore a great issue. However it did look good, which I suppose is one good thing.


Sunday, 8 March 2015

Parade, automatic drawings!

 After watching the parade performance, and taking inspiration from Picasso's costumes I began doing some automatic drawing to see if I could generate some ideas of my own in a similar style.
 I used a large range of colours and different media to try and encourage thoughts and ideas to come freely. To begin with I was being too structured with my drawings however in the above picture was where I began to let loose and really let my ideas flow on their own. Some of my best ideas were generated from this sheet of sketches even though they look like complete nonsense.
 I then began to refine these first sketches into something more understandable. I liked the idea of modifying the shape of the body so its unrecognisable. I also liked the element of parade where the man was dressed as a building, I wanted to do the same thing by making the performers look like an object.
 This is one of my favourite designs, although its simple I think it could be developed well into something more extravagant, as well as there being a large range of colour and design options for it.
 This is other favourite of mine, instead of a building the performer appears like an appliance, I went for a washing machine. I want to make dancers into every day objects that you take for granted and make them seem magical.
 This one is a more simplified version of the above one picture.
The last drawing I created was a set design, inspired by the building outfit from parade. I wanted to skew the perspective of the stage, and make the audience off balance. I didn't quite achieve this so I may do some research into how it is done on already up and running productions.

Sunday, 22 February 2015

AHHH THERES A BEE!

 The bee was the last addition to the outfit. I made it using yellow tights stuffed with wadding to give the shape of the body.  I then sewed on the details on by hand using scraps of fabric I found laying around the house, This gives its a more rustic homemade feel, like the rest of my costume has. I then created the legs and wings using my favourite material, WIRE!! This kept the wings looking delicate and see through. I contemplated using tissue paper to fill in the negative space between the pieces of wire, but I thought that this would make them look too heavy and not translucent anymore.

Wednesday, 18 February 2015

Taking it even further. . .


 Like I said in my last post. I wanted to take my fascinators even further by making them demand more space. I therefore took them from being a fascinator to a full outfit. I did this by using the techniques I learnt from making the fascinator but just upping the scale. This meant I could work quickly as I had already mastered the paper folding element to it. A challenge I did face was the fact that I had to find a way to support the petals so they didn't droop, due to the fact that the flowers had become heavier and couldn't support their own weight. I did this by threading the wire through the structure of the flower so it had some support for the petals.

I also like the fact that I used bright colours as opposed to white paper. This meant that the person wearing the outfit became almost invisible as all the attention is drawn to the brighter elements of the costume. This is what i wanted as I didnt want their to be any focus on the person but all on the flowers.
This is the reason I dressed the performer in all black
, and if this were to be used in a performance I would like for the background to be black also. This makes the colours in the costume pop, and look much brighter in contrast to the background.

The bee was a later addition which I believe ties the whole piece together.

Wednesday, 11 February 2015

Origami Part deux.

I took my ideas further by using a combination of more complicated paper folding techniques to create a more intricate fascinator, once again fixed onto a wire headband.

This one is more effective as it is bigger and therefore has more impact due to it taking up more space. I also like the way it obscures the face more than the last one as it feels like its taking over the person wearing it, and they are becoming the flower, not just wearing it. In order to take this work even further I would like to experiment with using more colour in the work as well as increase the size even more. I like playing around with space and different sizes. I think increasing the sale even more will make the work have an even greater impact.

Saturday, 7 February 2015

Who knew origami makes a great hat?


Using simple origami techniques I created this bird fascinator. I began using this material due to the fact I wanted to make something fun out of something plain and ordinary that we use every day. The Japanese art of paper folding was the first thing that came to mind. I began with one of the most simple folds you can do, which is the bird. I then attached this to a headband I made from wire. This was comfortable to wear and sturdy. I then added extra bits of decoration to make it look more like something someone would wear for fashion reasons. 

I liked the way this looked, as it was simple but effective. I got the idea for this piece from looking at crazy fascinators as a way of people expressing themselves. I think this linked in well with Alternative Miss World as its all about self expression and creating pieces of art from simple materials. Not only this but it represented the way that AMW should be celebrated like any other formal event, not just cast aside because its different. 

Thursday, 5 February 2015

Isn't that fascinating?

I wanted to look at making something out of simple materials, so I thought what's the simplest materials that I have access to that is also lightweight and cheap to use in large quantities? PAPER!!

So I started looking at simple origami techniques. After looking at the wide range of eccentric fascinators that have been created by different artists I decided to attempt making one myself. But before I start I will have to look at some research into how they are constructed and most of all how the different ways that they can be held on the head.


Wednesday, 28 January 2015

The journey through alternative miss world. . .

The alternative miss world is a big event in most peoples social calendars, but you don't attend wearing a suit and tie like you would for most important events. This is where I generated my idea from. I wanted to take usual high class dress and make it more fun and playful. This means top hats, fascinators and ties. I'm going to begin by looking at fascinators as I have seen some over the top ones worn by multiple celebrities to important events. I'm going to look into just how crazy these fascinators get, and if I can recreate this myself using simple techniques.

Tuesday, 27 January 2015

Building my first puppet from scratch!!

Building a puppet offered fewer problems than I thought it would before I began. Building the wire frame was quite simple, despite look complicated. The part that was rather challenging was,asking sure that the upper and lower jaw of the bird matched each other perfectly as without this the puppet would not work as easily as it should.

I built the frame from wire as it is easy to manipulate as well as being incredibly lightweight. The piece being light is important as it needs to be comfortable to be used by a performer for long periods of time. Not only this but it always easier to operate when it's lighter as well. 


Early on sketches done on my iPad showed how I wanted the finished piece to look, although they are not technical drawings I always find it useful to get down on paper exactly what you want something to look like as it gives you an end goal. I also sketched out how the mechanism on the inside of the puppet would look and work just incase I wanted to have something to refer to at a later stage. 

 After creating the frame it was time to create the blinking mechanism. Which I found online on YouTube. I found this video extremely useful as it showed how to create the blinking eyes for the puppet easily using ping pong balls and wire. 

The mechanism was easy to use and simple to construct and I will use it again if I ever need to create the same effect again on another piece. The only issue i did encounter was fitting the eyelids to the eyes as the fabric sewn to the wire frame to create the blinking lids would effect the eyes ability to open and close if it was too thick. I therefore had to change my use of fabric to accommodate this. I used a thinner material than I had intended. 

Once the piece was fully built I coveredit with natural feather and extra fabric hand sewn to the frame to finish the piece.  I was really happy with the end results and would like to try my hand at making more complexed puppets in the future as I found this one relatively simple. 


Thursday, 22 January 2015

The wo(man) behind the mask. . .

Working in latex is something completely new to me, and therefore a challenge that I was more than happy to undertake.

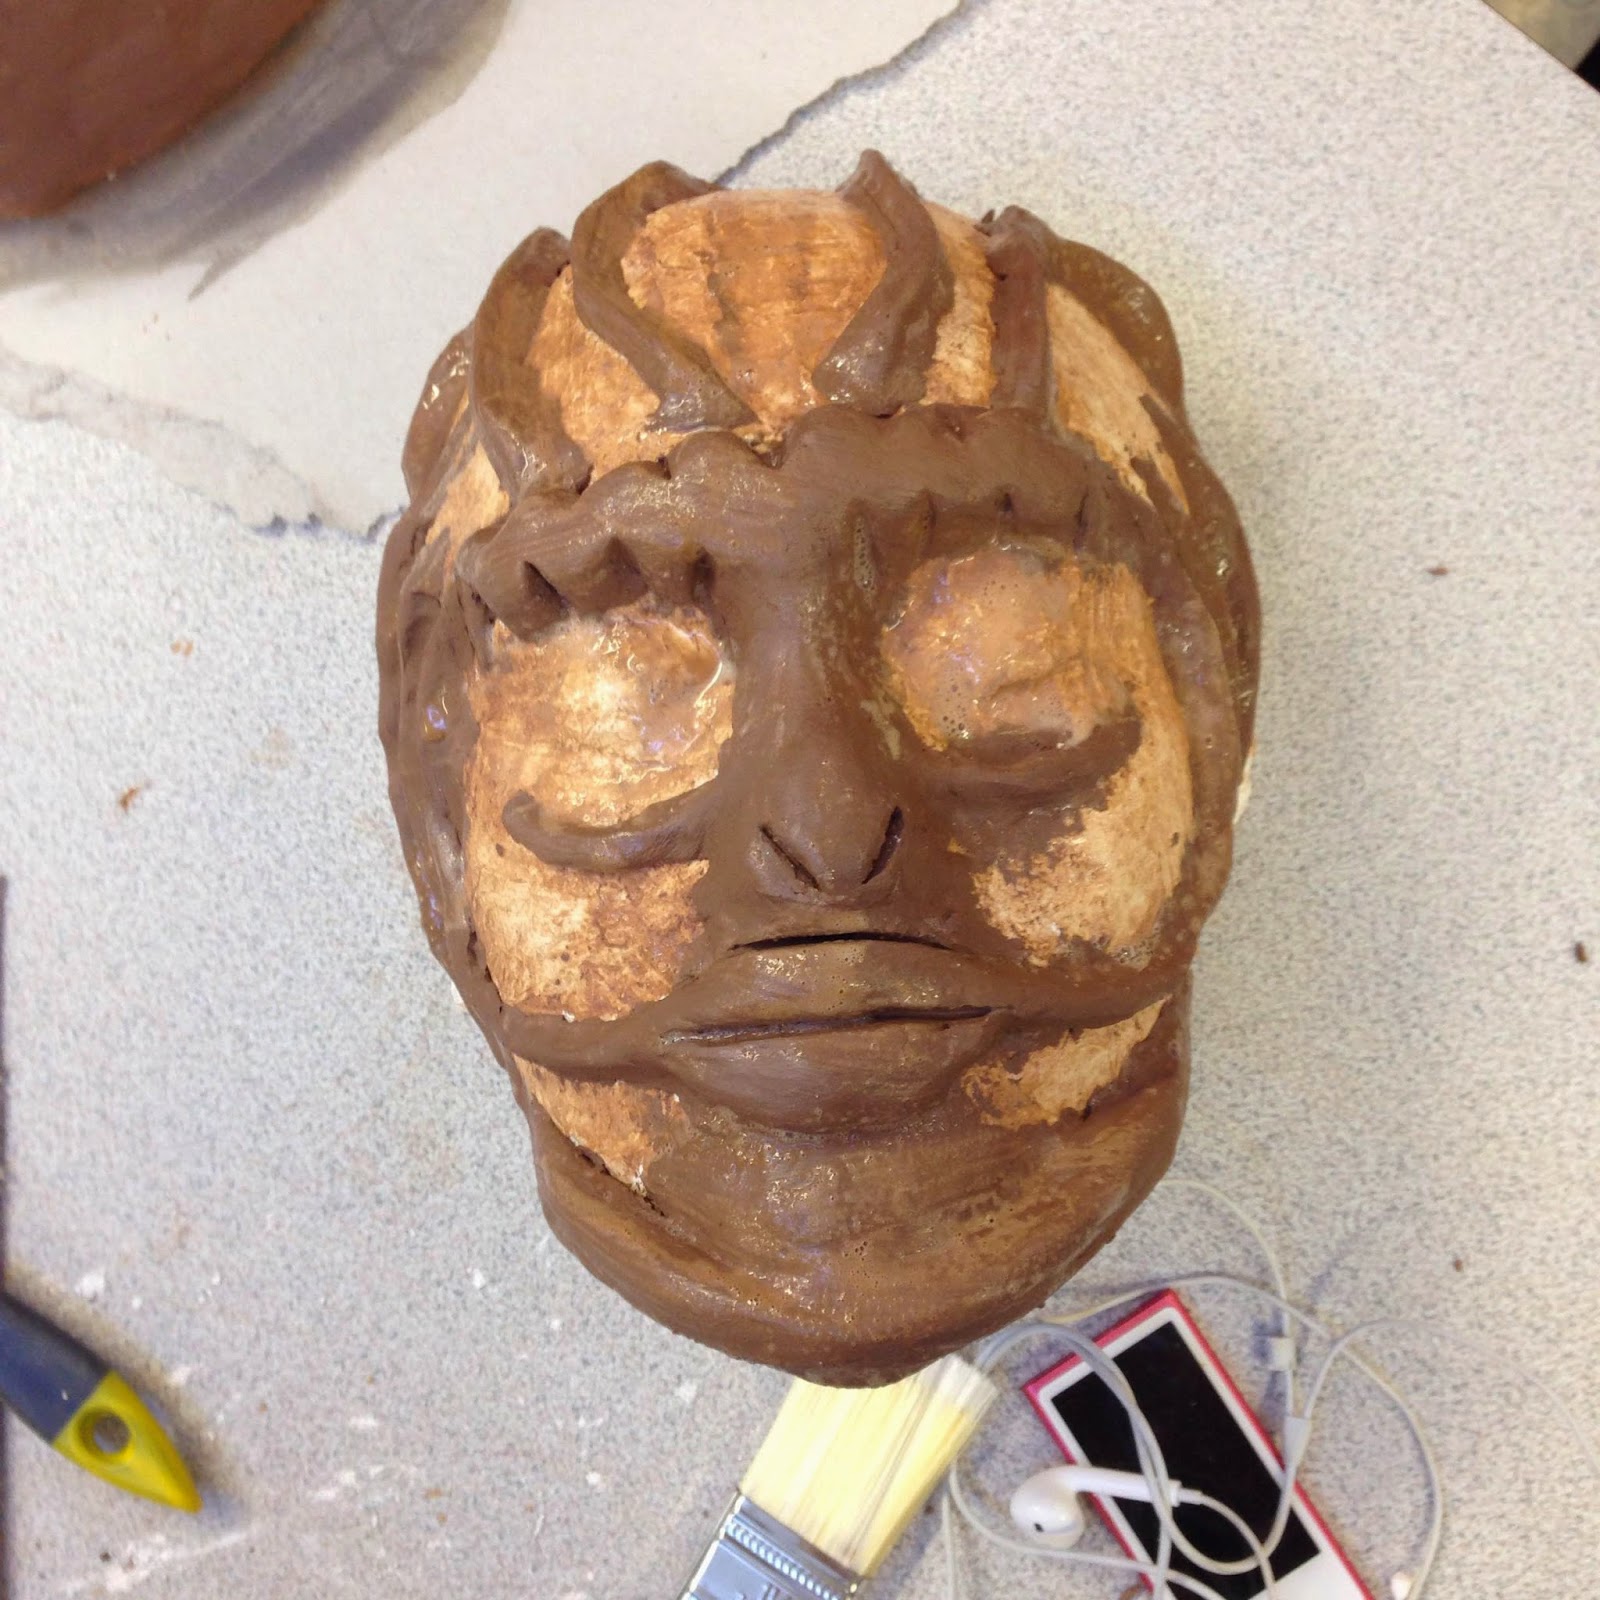
After creating a block of my face, by first getting an impression using plaster bandage and then filling this with plaster, the sculpting of the features could begin. Building up key parts of the face with clay to create something that bares as little resemblance to my face as possible.

I decided to make my mask a person make of leaves and vines. This idea sprang to mind whilst looking at folk art as I started thinking about all the things around my home town that make it the place it is. The first thing of thought of was Sherwood forest, which is just a stones throw away. And long story short, that how the idea for my mask happened.

After multiple tedious layers of latex my mask was off the starting block. Another layer of coloured latex (green) as well as some extra detail added using wire, cotton and tissue paper and voila! ITS FINISHED!

For my first ever attempt at making a mask using latex, from scratch, I am quite proud of the outcome. Although I clearly have a lot to learn about relevant techniques for the material I think my first stab was a good go. Not only this but next time I would like to try making my block using alginate instead of plaster bandage and plaster as alginate picks up a great deal more detail that other techniques.