Wednesday 24 June 2015

Putting up my exhibition!

When creating my exhibition I wanted to create a Forrest like atmosphere so both my puppets felt perfectly at home in their environment. I wanted a dark enclosed feeling space, surround by natural materials and earthy colours. 

I managed this by creating walls out of brown parcel paper and lengths of skrim hanging from the ceiling. All the walls of my exhibition were covered in the same manor so the entirety of my area was darkened, in contrast to all the white walls of the other exhibitions. 

I then weaved willow into the skrim by hand to create a tree like appearance on the walls, I also covered the floor with leaves collected from outside the art centre so the concrete flooring was no longer visible. Being able to see the floor would've killed my indoor forest illusion. I then placed my deer puppet on a mannequin on a raised platform. I situated the puppet so visitors could walk around the puppet and see it from all angles. This was important to me as I wanted people to feel like they could get up close and even touch it if they wanted, to help them understand the piece. 

I was happy with the space I created, and felt it displayed my work in the best lift possible. As well as showing my capabilities in creating a set like design for my area. Using all the skills I have gained over the past year of my foundation course. 

Monday 22 June 2015

FINALLY FINISHED!

I created the body of my deer using a simple combination of wadding and loose pieces of canvas I had collected over the years since GCSEs. The face however was more challenging. 
I created the face of the deer using a camping mat. The foam was the perfect combination of both light weight and easy to manipulate. I created a simple pattern, sketches of which are to be found in my sketch book and then stuck different sections of the foam together to make a 3d shape. This was a simple process and was very time effective. 

I was happy with the finished product as it worked exactly how I intended and looked exactly how I had envisioned from the outset. ITS FINALLY COMPLETE!!

Saturday 20 June 2015

The real deal


From creating my prototype out of grey board I had learnt that I would need a more durable material to create the body of my deer. To make it more sturdy and therefore less likely to break or stop working correctly. This lead to me being the only girl in the whole of wickes stood with two sheets of hardwood and a bag of nails and washers in my hand. These materials however worked really effectively as the extra weight of the hardwood meant that the lower section of the front legs no longer needed weighting down at the hoof. As they now functioned perfectly fine without. 

I used my early sketches to choose the colours and paint design on the deer itself. If you put my design work and actual physical work side by side you can see the consistsncys in the work. 
I made no changes to the body suit I had created for puppet at it had worked perfectly fine it all my tests of the work and functioned perfectly. 

Thursday 18 June 2015

Tweaking the mechanism. . . AGAIN!


Although the cable to operate the front legs worked, it did need some fine tuning. After attaching the cables in multiple places I found it worked best and the widest part of the upper thight. This meant that the amount of cable that was actually being pulled was quite short and therefore a small pull gave a large amount of movement. Making the deer easy to operate. I also established that on the real version of the puppet I would have to use washers or something similar to keep the joints of the deers legs from wobbling because their was too much room for movement. Once I had figured out the issues with this prototype version I decided to was time to begin the real thing. And take on board all the alterations I had made to the original plan throughout my design process. 

Tuesday 16 June 2015

The prototype Bambi


I encountered multiple problems when creating the front legs for my deer. The mechanics I wanted to use failed and did not work and effectively as I had thought they would. The back hind legs were joined diagonally to the front legs (this meant when the back left leg moved the front right legs would move at the same time). The wire was not strong enough and was buckling when pressure was put on it in the form of the performer walking. However s stronger material would have meant s heavier material which would've made the puppet extremely difficult to operate and uncomfortable to use. I then had to explore other methods of gaining movement in the front legs. I came up with two alternative solutions. Of which I drew very simple sketches. 


The first solution I came up with was to attach a pole to either front legs, just above the knee. This would mean the performer would operate the front legs using their hands by lifting and pushing the poles in synchronisation with the back legs. 

The second possible solution was to attach cable to the front of the knee. Which in turn would run up through two guides and are pulled by the performer in order to lift the legs from the knee upwards and weighting down the bottom section of the legs so they would move freely but follow the direction of the upper leg. 

After trying both solutions I decided the second was the most effective. Although the poles did work, they made moving me the legs hard work and sometimes caused the legs to move at a slant away from the body of the deer, making it look wonky. I decided that the cables from the front legs were the most effective idea and fitted the cables straight away. 

Friday 12 June 2015

the owl, drawn on a graphics tablet. .

This was my finished sketch for my owl puppet drawn on a graphics tablet using photoshop. This is one of the first real pieces of work I have created using and tablet and once used to how it worked I fell in love. You canavhieve a whole new depth of colour and different textures when compared to something hand drawn. Not only this but it gives an all together more professional finish to the sketches, something I would be proud to present as part of my FMP. I will continue using graphics tablets in an attempt to improve my skills and learn new techniques when using photoshop.

Saturday 6 June 2015

Sketches, how I want things to look.


Using a graphics tablet I managed to take earlier on designs I had drawn and make them into a more accurate view of how I wanted my work to look. This picture above is a cross section of my owl puppet I created early on in my FMP. This will be a key part of my finished exhibition because it shows the inner workings of the piece that you won't be able too see just looking at it. And therefore shows that a piece of work that looks like it may take complicated mechanics to work is actually a simple series of pulley and a main shaft running up to the Owls head. 

I like this drawing also because on the left it shows how I want it to look visually and shows people how I have followed a plan for the appearance of my puppet and that it isn't just something that happens of its own accord. 

I then did the same thing with some preliminary sketches I had done into the anatomy and proportions of deer early on from my FMP. This also gave me an appearance to strive for when working on how my deer puppet worked. Not just the integral mechanics of the piece. I think this not only mimics the look of the characters from the film bambi but changes it to suit my style of work, so it has my own personal stamp on it. 


Thursday 4 June 2015

Bringing Bambi to life. . .


I'm really pleased with how this puppet is going so far, I have created it out of grey board, therefore it is still quite durable but quick to make and lightweight to use. However the movement isn't 100% the way I want it, I'm going to try attaching the knees of the deer to my knees so the legs are attached at two points not just at the foot. I believe this will give greater control of how the movement goes as this means the knees will stay in line. Another issue I am going to address is that the joints need to be more sturdy as there is too much room between the stopper on the hinge and the leg itself, this causes the joints to wobble. I would like to get rid of this wobble as it effects the look of then movement when viewing the puppet from an onwards angle, however it is not as noticeable from a side view like in this video.

Thursday 28 May 2015

Creating Bambi puppets.

After searching through Youtube I managed to find a video of a puppet created by someone for a stage performance. This was one of the most valuable to pieces of research I have found as he shows you the process of the building of the puppet. Not only this but seeing a simple mechanism being used for the process  makes the mechanism easier for me to process and understand, and therefore translate into my own work.

This would be useful to be put towards the other puppet I intend to make for my FMP, which is a Bambi puppet to go alongside the drawings and research I have done into the Disney film.

Not only this but I have researched into the movement of deer, how they work and their mannerisms. As well as their general appearance and stance.


These early on sketches will be used as the basis for all my FMP work. These show not only how the character from the film looks but how wild deer look too. Intended to combine the two by creating a puppet that is the correct proportions and moves in a naturalistic way, but also maintains the iconic image that is the character bambi.

Monday 25 May 2015

The finished thing, and how I feel about it

After creating the body and face of the puppet I then created
the wings which would form part of the mechanism for the puppet. I made these using the same process as the head and body of the puppet. This was once again an effective means of creating the work as it was a sturdy piece I ended up with.

I attached the wings using the method I outlined in my earlier drawings for the mechanism of the piece. I had to re arrange the positioning of the wings multiple times as the mechanism did not work as effectively as I had hoped from the prototype version I made previous to this final version.

I gave the work a final coat of varnish to give it a more even and high end finish. I think this gave the owl the finished look I needed.


Another issue I encountered was that in the prototype version of my owl, the mechanism for the mouth worked really well. However in the finished version, once I'd built up the face using paper mache', I restricted the amount of room for lower beak to move up and down in order to make the puppet look like its talking. As a result the puppet does still appear to speak however their isn't as much control there as I had initially intended to see. Instead of a simple up and down motions I have accidentally created a more complicated sort of diagonal motion, where the jaw moves both up and down, as well as in and out at the same time. Although this is not what I intended I am still happy with the outcome, however given I larger time scale I would like to recreate the work or have the opportunity to investigate the matter further in order to get the puppet working to its full potential.


0

Friday 22 May 2015

Forming the Owl!


I created the owl by masking taping newspaper onto a box I made out of cardboard. This was an easy method to create detail in the puppet quickly and easily. I then used paper mache to cover the face and set the features I created. I then added a second layer using toilet tissue and this is easier to manipulate as well as absorbing the glue easier.


I then repeated the same technique to create the body of the owl. I think this method was effective as it created a stable body for the owl whilst keeping the puppet light and therefore easy to operate.


I then painted the face using acrylic paints and will add a layer of varnish once all painting is complete in order to give a high finish to the piece. I don't want it to look rustic or realistic, I want the piece to look stylised and almost cartoon like to represent the cartoon of 'Bambi' that I have based my entire project on.

Thursday 14 May 2015

The creation of the wise owl.

I started this section of my project by looking at the character of the wise owl from Bambi. I looked at images of the bird, and how it moves in the animation. I established that my puppet only needs to be able to do 3 simple movements: rotate its head, lift its wings and open its beak. 

After researching into simple ventriloquist dummies,  I devised a simple mechanism to go in my owl puppet.


After figuring out the general mechanics, I then began to refine by drawings of the mechanism inside to make it more clear how it is going to work, so i make fewer mistakes when creating the finished product.
After i'd done this, I created a prototype version of my puppet in order to check the mechanism works properly. I did this just using paper for the base, tape, a pencil and some string. The outcome was pretty good as it worked just how i wanted it to, and was actually a pretty sturdy mechanism to say it was made from flimsy materials. 


Friday 1 May 2015

The Creation of Bambi;

Since looking at The Lion King, and how it has been adapted from a Disney Animation to a large musical stage production, I have decided that for my FMP I will look at creating work for a production of Bambi. I would like to look at how they stylised the animals for The Lion King production and aim to do the same under the pretence that Bambi is being adapted for theatre, as was done with The Lion King.

What made The Lion King work? How can I translate this to a new musical?


After looking in depth at The Lion King musical, I decided to look at the woman who was behind the puppets. Her name is Julie Taymor. Ultimately the success of this stage production was down to the puppets, costumes and artwork created by  Julie Taymor. Her work is stylised, and therefore not realistic. This means that she is not trying to achieve realistic perfection, and therefore her work

cannot be compared to real animals. The stylisation means the puppets are more likely to be viewed as artwork, and an interpretation of animal. This is clever as it means people w
on't view her work negatively just because its not a perfect realistic looking lion or zebra.


I decided that seen as though it has been possible for one Disney movie to be translated onto the stage, I have set myself the task of doing the same for a different film. Bambi. I chose this film due to the large amount of animals in the movie, and therefore the amount of opportunities for different puppets is larger, and there is more choice. 

The animals I am going to focus on mainly are, Bambi himself, Thumper the rabbit and the wise owl. I have made these choices for several reasons. 
Bambi: Because I found lots of online research into creating deer puppets, as well as videos of deer movements.
Thumper: Because this offers a new challenge as I will focus on getting the thumping movement of his foot as opposed to focusing on the ears and eyes. 
The Wise Owl: Doesn't need blinking movement, but offers a new challenge in the wing movement, something I haven't yet created.

Thursday 23 April 2015

General mechanics

I found looking at ventriloquist dummies an effective use of my time as it shows that you can get a large range of different movements into a small compact puppet. Looking at this has helped me form and idea of how to use a series of different pulleys or leavers in order to create movement. From this research I will be able to devise a simple mechanism to be used as part of my FMP.

Friday 27 March 2015

The swinging 60's, pop art and Ray Harryhausen. .

Saying I've done in depth research about this subject area at this moment in time would be a lie. I have however done a small amount of research on a wide range of different artists, skimming the surface of the sixties if you will.

Obviously the person who I found most interesting was Ray Harryhausen, the king of stop animation during that time. He worked on things such as clash of the titans, and mighty Joe young. He worked closely with producers such as Warner Bros. and therefore became a well recognised artist pretty quickly. His first film was created in 1953.
Richard Hamilton

Friday 20 March 2015

Looking back IS looking forward.

Looking into the history of art allows you to see how art in the present, may develop in the future. Only by knowing the past can we anticipate the future. Modern expressionism has never been the kind of work that  I have been interested in, or even understand. But after doing some research into the artists, I've began to see that their work really does what it says on the tin. they are expressing how they feel through the only way they know best, painting.
 
So what have I learnt from all this.
  1. That artist movements are entirely the product of the environment surrounding influential artists.
  2. Work can be full of life without being full of colour.
  3. Artists react to the world around them, and often fight against the norm. Not to cause friction but to chase change.
  4. I HATE any work produced by mark Rothko and no amount of conversation about his work will change that.
  5.  

Modern expressionism, Pollock, Still, Motherwell and Kline. . . .

Modern expressionism began after the second world war and began to take form during the 1950's. it was thought to be way for people to release their feelings and thoughts into a more creative outlet. The leaders in this time of work were people such as Pollock, Still, Motherwell, Kline and Rothko.
 
Something that made some of the modern expressionism work more interesting was the scale that they worked on. They were usually larger pieces as many of the artists have said it allows them to get 'into' the painting. Meaning they can connect with it and feel the way the piece should progress.
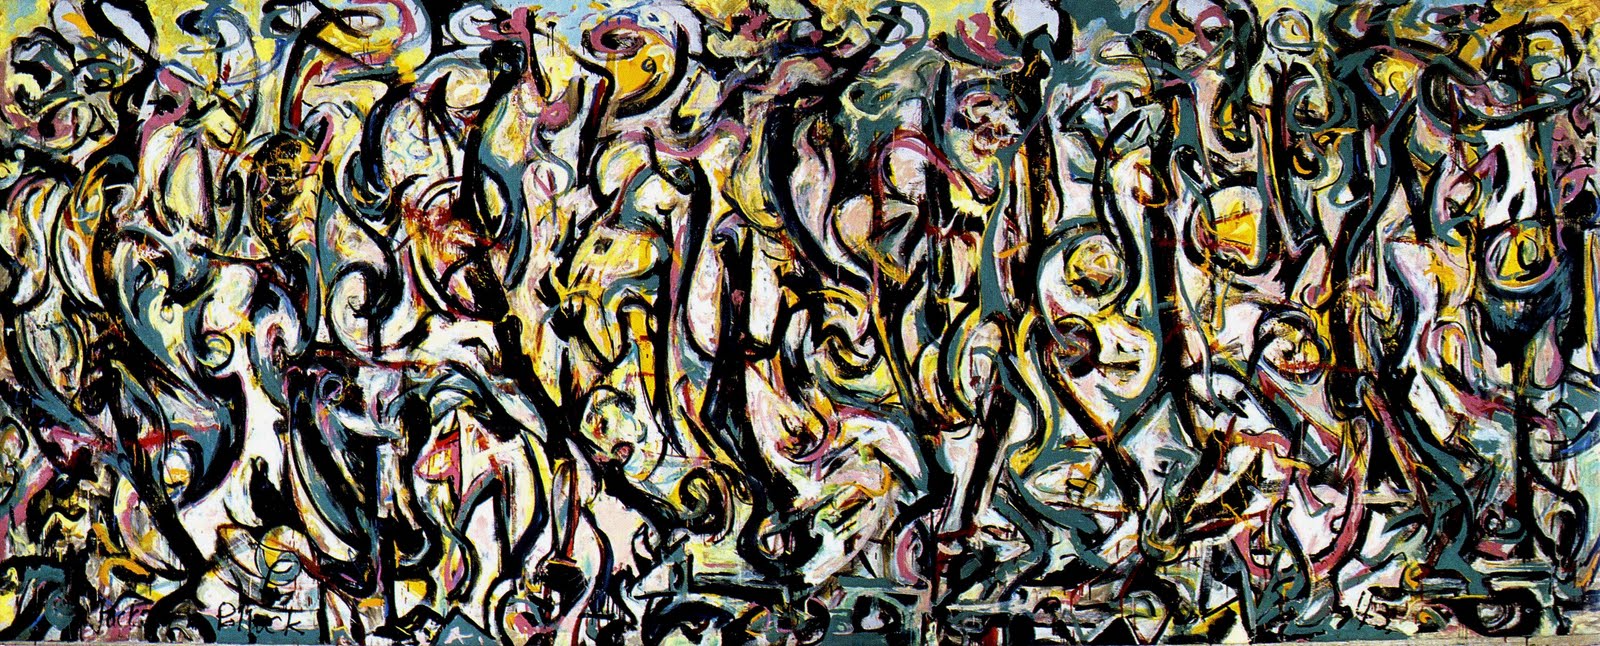
Pollock worked on large scale and placed his canvas' on the floor. He also used foreign objects contained in his paint, such as sand, pebbles, broken glass and string. These added a whole new dimension to his work as it began to incorporate texture as well. 
Expressionism allowed for free movement, not having to stick to any compositional rules in their work. Expressionism is so interesting because the whole canvas is the main subject of the painting, unlike a portrait where the subject of the work is the person whose portrait it is. This means that the eye keeps moving over the piece trying to find a main subject of the piece, something to concentrate on.
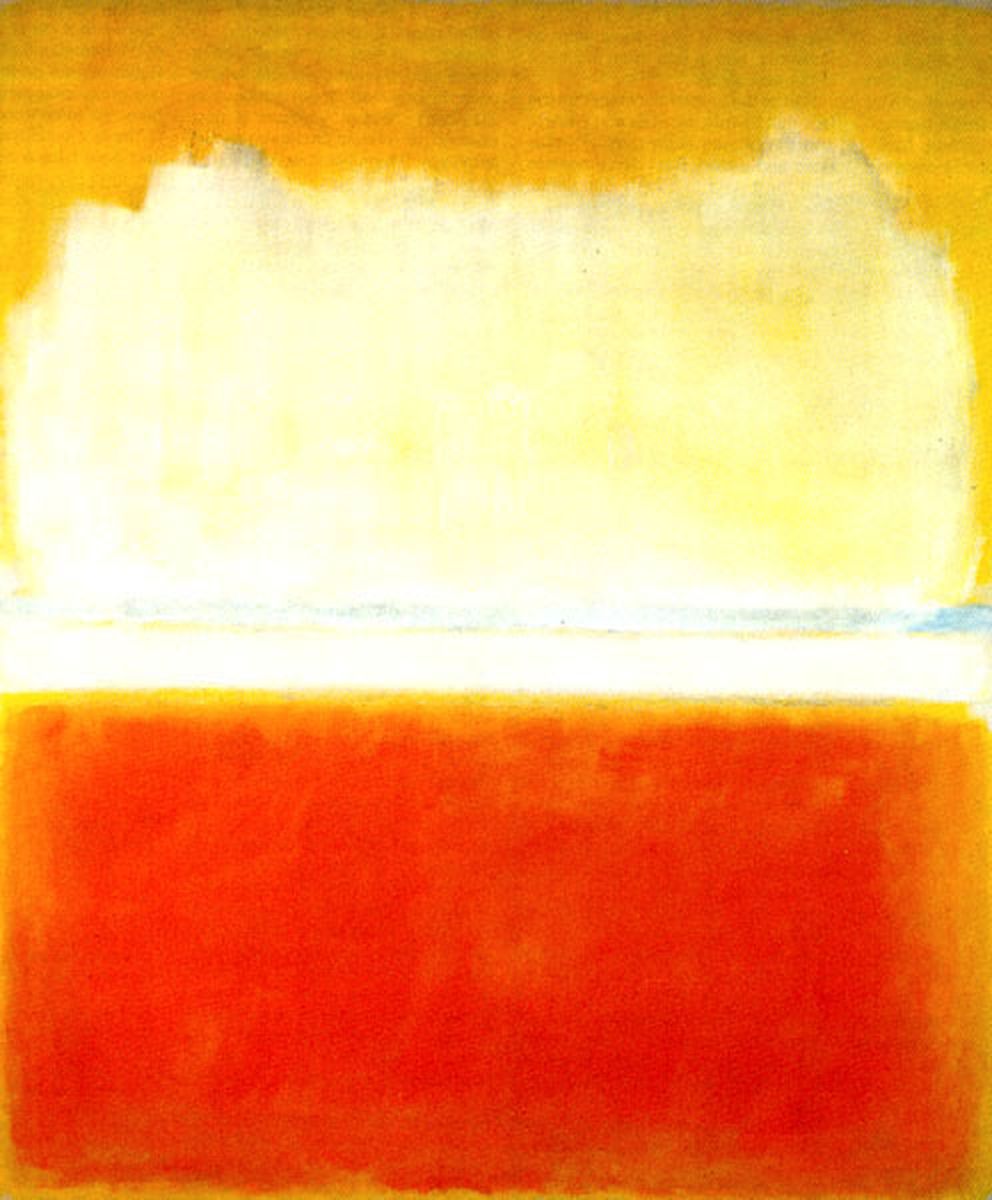
Personally I like Pollock's work, I feel like I could look at it for hours and still find something new that I had over looked at first glance. However I cannot say the same for expressionist work by artists such as Rothko.

Although many enjoy his work, I am not one of them. I feel that his work is flat and devoid of life, which does not appeal to me. Not only this but it doesn't capture my imagination or interest like the work of Pollock or Kline. I feel like at a glance, I have already taken in all the information that the piece has to offer and therefor their would be no merit in me looking at it any longer. Essentially, I find it boring as hell. I find it strange to thing that work by Rothko is even from the same time period and movement as that of people like Kline.
 
 Even though his work has barely any colour at all, it has much more life than any of the work I have seen by Rothko. The lines seem to tell a story, represent something and show some kind of emotion to me where as Rothko's work effects me in no means at all. If that is what he was trying to achieve then he has done a cracking job.


Friday 13 March 2015

Max humphries, and simple mechanisms.

Max Humphries is an amazing puppeteer, who builds full costumes on  the basis of simple mechanisms. He has worked on pieces for stage productions such as The lion the witch and the wardrobe, Romeo and Juliet and Raven Girl.


Carving  from florists oasis is something I have seen recurring in different puppet making techniques. Its incredibly light and easy to carve from using simple tools such as a stanley knife or even just a pencil. Not only this but wire easily held inside it easily. it is also relatively cheap and therefore large pieces of work can be done without spending too much money. 

This mechanism was on Max Humphries website and shows how simple some mechanisms can be. i am going to attempt doing this using a clothes peg from home.

Degenerate Art

Before I start a massive discussion about what degenerate art means to me and how its influenced other work, I think  I should first talk about what it is. Degenerate art is work that was considered  low skilled and offensive by Hitler and his Nazi party in the 1930's. If something was considered degenerate, it meant it deviated from accepted norms at the time.

Works of modern art, expressionism and impressionism were all collected together and displayed in an exhibition which aimed to ridicule the  artists and those that followed the modern art movements. Pieces of work which still today would be considered high end inspirational works were mocked using graffiti, changes in the work title and badly reviewed by Nazi propaganda. Artists featured in the Degenerate art show were those such as Piet Mondrian, Paul Klee, Pablo Picasso and Vincent van Gogh. Over 16,000 piece of work were seized by the Nazi party and were placed on display. The Degenerate art show was one of the most publically viewed exhibitions in history, which toured Germany and neighbouring countries for a number of year. It was thought to have attracted around  3,000,000 viewers. Although not all of those going to view the work agreed with his political views about it. Many fled to see the works as they believed it may be the last ever opportunity they would get to see the works of artists they saw as revolutionary practitioners. After the burning of the books there was no certainty of where, or in what condition the works would end up in once the Nazi's were finished with them. 

How do I feel about it all?

I feel that Hitler's attacks on modern artists were about control of that that he could not understand. He saw those who followed the expressionist movement as communists and Jews, the two things he hated most. Art can have great power over people, how they think, what they feel about certain issues. Hitler only confirmed the influence of modern art by seeing its destruction as a key part of his control over Germany.  

The fact that artists had to leave their country and quash their own creative instinct because someone told them how they expressed themselves was wrong. I also believe that it effected the natural evolution of art and that if the mockery of modern art had never happened then maybe the art world would have progressed even quicker, changing people perceptions of  art and its influence on them. However I think that this lead to a chain reaction of events that benefitted the art world, in spite of Hitlers attempt to remove modern art. The dispersion of the German artists lead to revolutionary pieces of work that changed art history for ever.  

Wednesday 11 March 2015

Making designs a reality


I decided to make my automatic drawings a reality by inflating bin bags on different sections of my body in order to alter the shape of the body.  I did this by securing the bags around my legs and arms tightly and inflating them using a foot pump.


This altered my appearance in the way I had intended and with some fine tweaking could create a cool piece of costume. If not the most practical.


I then began doing multiple bags on different limbs at the same time to see how much that changed the appearance of the costume.
 
 THIS WAS NOT COMFORTABLE! JUST SO YOU KNOW THAT!!!
I did like how it worked, it really made my appearance change and threw out the natural body shape you are used to seeing.  I then realised that the red elastic I had used to keep the bag on my head looked like a bow tie, and decided to turn the whole of the bag into the face of the character. This is not meant to be racist, I only had black bin liners.


I then covered myself into a black sheet to disguise the body and face so you cant tell that the head of the character is actually just air and not a person at all. I think this is an interesting idea and I might try develop it further by combining my earlier automatic designs with this practical technique to create a costume inflated by air.